Last updated: June 11, 2026
Building a Custom OpenTelemetry Collector (OCB Guide)
The official OpenTelemetry Collector Contrib distribution is like a Swiss Army Knife, with hundreds of components for every imaginable observability scenario. But that 'everything and the kitchen sink' approach comes with significant trade-offs.
The default build is often bloated with components you'll never use, which increases memory footprint, slows startup times, and expands the security attack surface since every unused component is extra code that could potentially contain a vulnerability.
This is why building a custom Collector is a best practice. Instead of a Swiss Army knife, you'll create a lean, efficient tool designed for a specific job.
This approach isn't just for creating lightweight agents for deployment. It's also essential for:
-
Developers building their own custom processors or exporters, as it provides a clean environment for testing.
-
Operators who need to build specialized collectors with unique debugging tools to troubleshoot complex telemetry issues.
In this guide, I'll walk you through the entire process, step by step. Let's get started!
Prerequisites
To follow through with this article, you'll need a recent version of Go and Docker installed locally.
Understanding the OpenTelemetry Collector Builder (OCB)
Before you decide what goes into your custom Collector, you need to understand the mechanics of the tool that builds it.
The OpenTelemetry Collector Builder is a command-line utility that automates the creation of a custom Collector binary. It takes a manifest file (which we'll define soon) and handles everything from generating source code to compiling the final executable.
Specifically, it creates a main.go and other boilerplate files, resolves
dependencies via a go.mod, and then invokes the Go compiler to produce a
statically-linked and fully custom Collector binary.
In short, OCB turns what would otherwise be a complex, manual process into something declarative and repeatable.
To get started with the OCB, you need to install it first. For stable and reproducible builds, you should use one of the two officially recommended installation methods.
For CI/CD environments, the preferred method is to use the official Docker image, which ensures a clean and consistent build environment every time. First, pull the latest image:
1docker pull otel/opentelemetry-collector-builder:latest
To run the builder, you'll mount your manifest.yaml and an output directory
into the container. The final binary will appear in the ./dist directory on
your local machine:
12345docker run --rm \-v "$(pwd)/manifest.yaml:/manifest.yaml" \-v "$(pwd)/dist:/dist" \otel/opentelemetry-collector-builder:latest \--config=/manifest.yaml
This command mounts your manifest file and output directory into the container,
then runs the build. The resulting binary will then appear in your local
./dist directory.
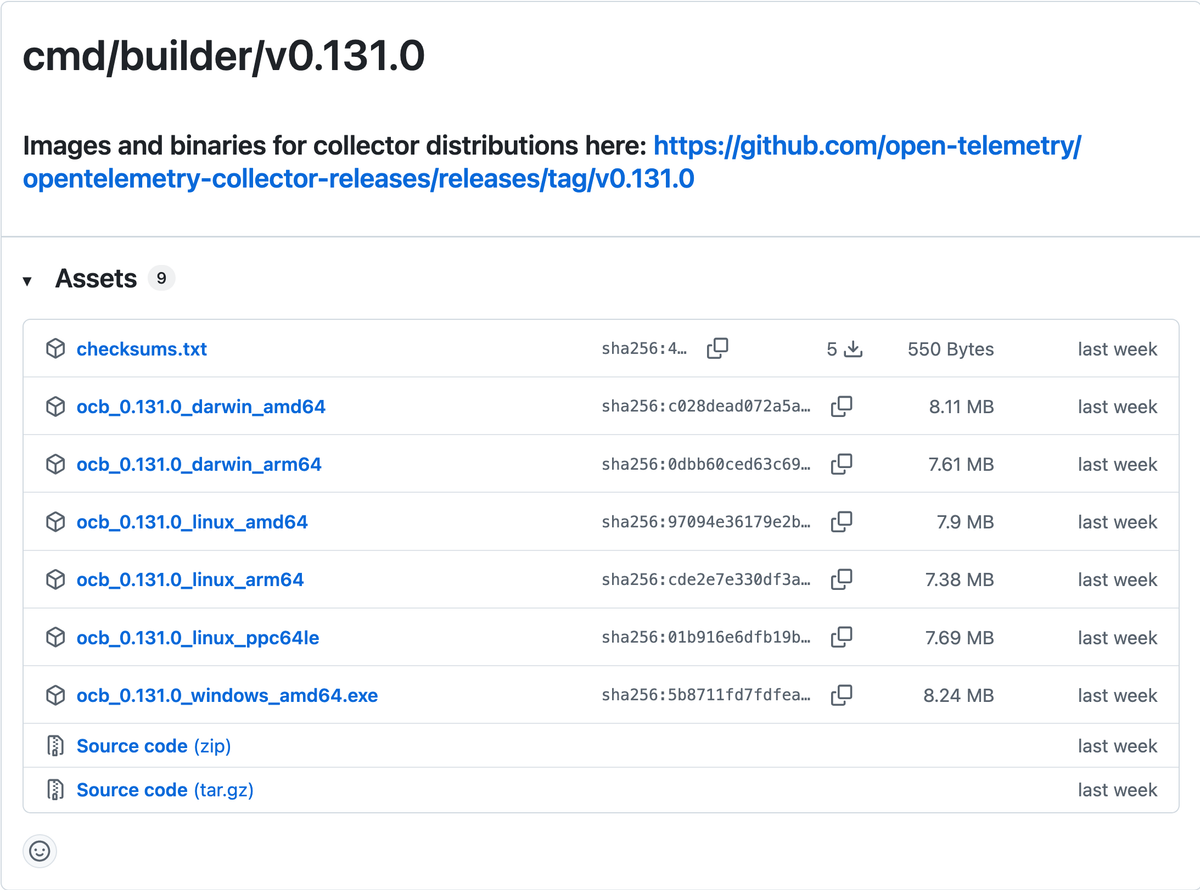
For local use, downloading a pre-compiled binary is the recommended option. Just
head to the
OpenTelemetry Collector Releases,
grab the latest version of ocb for your platform, and place it somewhere in
your system’s PATH.
Once installed, you can invoke it directly:
1ocb --help
1234567OpenTelemetry Collector Builder (v0.131.0)ocb generates a custom OpenTelemetry Collector binary using thebuild configuration given by the "--config" argument. If no buildconfiguration is provided, ocb will generate a default Collector.[...]
With the builder installed, it's time to define the manifest for your custom Collector.
Building a custom Collector binary
The foundation of your custom Collector is a manifest file which defines the exact components that should be included in the final binary:
12345678910111213141516# manifest.yamldist:module: github.com/dash0-examples/otelcol-prodname: otelcol-proddescription: A minimal OpenTelemetry Collector.output_path: ./distversion: 1.0.0receivers:- gomod: go.opentelemetry.io/collector/receiver/otlpreceiver v0.131.0processors:- gomod: go.opentelemetry.io/collector/processor/batchprocessor v0.131.0exporters:- gomod: go.opentelemetry.io/collector/exporter/debugexporter v0.131.0
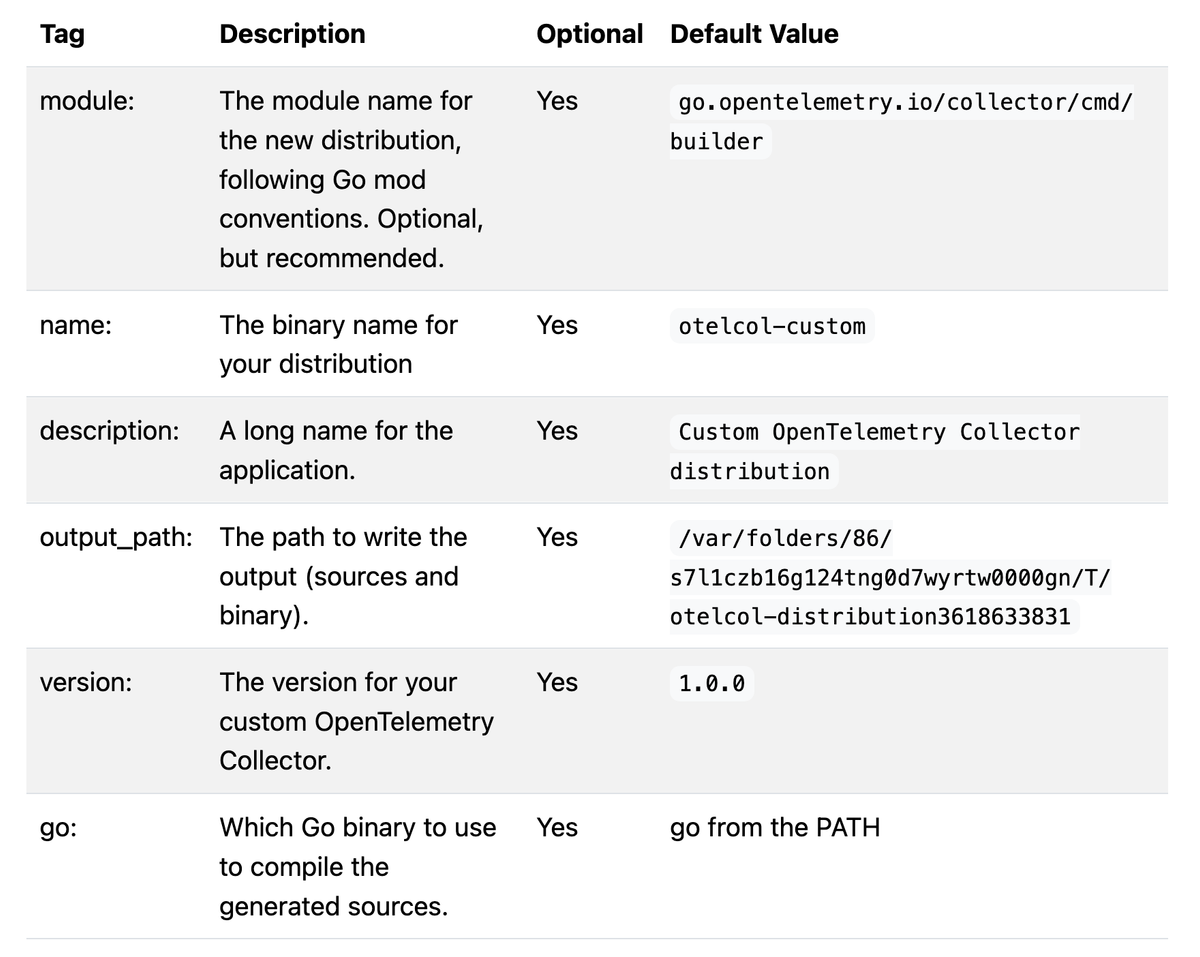
This manifest has four top-level sections that define your custom collector. It
starts with the dist which contains metadata about the distribution itself,
such as the name of the final binary (otelcol-prod), its version, and where
the build artifacts should be placed (./dist).
It's not about OpenTelemetry functionality but rather about the binary you are
creating. The dist tags are all optional and are for customizing the defaults:
After the dist section, the manifest defines the core components that make up
your custom Collector. Each list specifies the exact components to include, and
where to fetch them.
The gomod field identifies the Go module path and version for each component,
allowing the ocb tool to fetch the exact source code needed to guarantee
reproducibility.
With this basic setup, you can receive data through the OTLP receiver, process it efficiently using the batch processor, and export it to the console with the debug exporter.
To see it in action, run the ocb tool and point it to your manifest file as
follows:
1ocb --config manifest.yaml
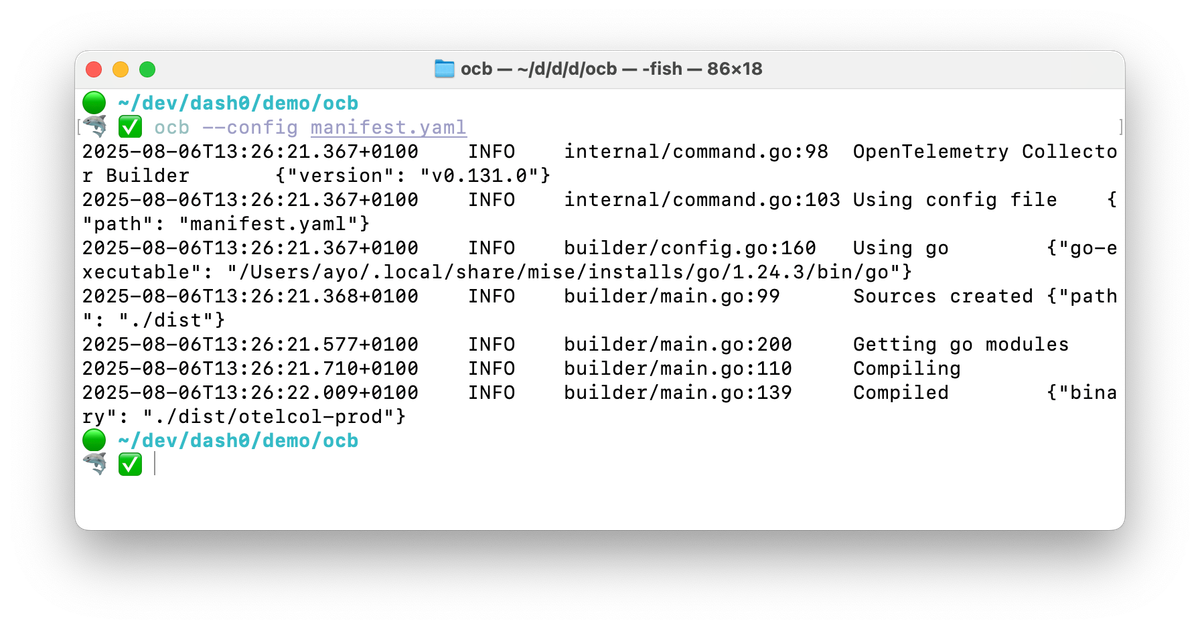
The build will commence and you'll see the following output if everything goes well:
12345672025-08-06T13:24:34.595+0100 INFO internal/command.go:98 OpenTelemetry Collector Builder {"version": "v0.131.0"}2025-08-06T13:24:34.596+0100 INFO internal/command.go:103 Using config file {"path": "manifest.yaml"}2025-08-06T13:24:34.597+0100 INFO builder/config.go:160 Using go {"go-executable": "/Users/ayo/.local/share/mise/installs/go/1.24.3/bin/go"}2025-08-06T13:24:34.599+0100 INFO builder/main.go:99 Sources created {"path": "./dist"}2025-08-06T13:24:59.822+0100 INFO builder/main.go:200 Getting go modules2025-08-06T13:25:28.673+0100 INFO builder/main.go:110 Compiling2025-08-06T13:25:36.011+0100 INFO builder/main.go:139 Compiled {"binary": "./dist/otelcol-prod"}
As specified in the dist section of your manifest, you now have a folder named
dist containing both the source code and the compiled binary (otelcol-prod)
for your custom Collector.
The directory structure should look like this:
12345678dist├── components.go├── go.mod├── go.sum├── main_others.go├── main_windows.go├── main.go└── otelcol-prod
You can now run the otelcol-prod binary and provide a Collector configuration
for the included components:
1234567891011121314151617181920# otelcol.yamlreceivers:otlp:protocols:grpc:endpoint: 0.0.0.0:4317processors:batch:exporters:debug:verbosity: detailedservice:pipelines:logs:receivers: [otlp]processors: [batch]exporters: [debug]
1./otelcol-prod --config otelcol.yaml
Then, once you start sending data, you should observe it flowing through the pipeline. Thanks to the debug exporter, you'll see the trace data printed directly to the console:
Finding and referencing Collector components
To build a useful collector, you need to add components like receivers,
processors, and exporters. But how do you find them, and how do you figure out
the exact gomod path to use in your manifest?
This process can seem tricky if you're not a Go developer, but it follows a simple and consistent pattern. You'll find most of what you need in the following two packages:
-
opentelemetry-collector: Contains the core, most essential components.
-
opentelemetry-collector-contrib: Contains hundreds of additional components provided by the community and vendors.
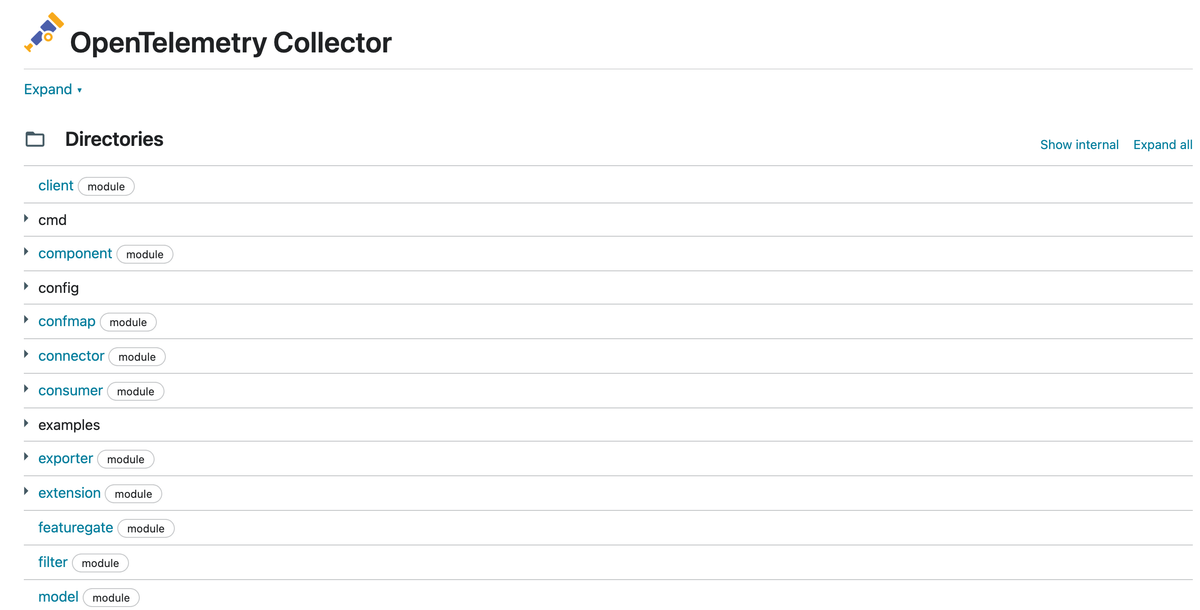
To find a component, you can browse the Directories in these packages. For
example, to find the otlpreceiver, you would navigate to the receiver
directory in the core package.
Once you've located a component, you only need to copy the module path and take note of the version:

You can then combine the module path and the version tag in your manifest.yaml
as follows:
12receivers:- gomod: go.opentelemetry.io/collector/receiver/otlpreceiver v0.131.0
The exact set of components you'll choose to include depends on your data sources, where you're sending the data, and how you need to process it along the way.
Here is a recommended "starter pack" to consider for your custom collector:
Receivers
- OTLP Receiver: For receiving telemetry data from your applications using the native OpenTelemetry Protocol.
- Prometheus Receiver: For scraping Prometheus metrics.
- File Log Receiver: Allows you to ingest log records into your pipeline from files.
Processors
- Memory Limiter Processor: Regulates the memory usage of the collector to prevent Out Of Memory crashes.
- Batch Processor: Improves performance by grouping telemetry into batches before exporting.
- Attributes Processor, Transform Processor, Resource Processor, Redaction Processor: For enriching, redacting, and standardizing the data flowing through your pipelines.
- Tail Sampling Processor: Allows you to make intelligent sampling decisions on your trace data so that you keep the most important traces.
Exporters
- Debug Exporter: It prints telemetry to the console, allowing you to easily inspect data flowing through your pipeline.
- OTLP Exporter and OTLP HTTP Exporter: For sending data to any OTLP-compliant backend over gRPC or HTTP.
Connectors
- Span Metrics Connector: Allows the generation of RED metrics directly from your trace data.
Just ensure that each selected component is placed under the correct top-level
field in your manifest: receivers, processors, exporters, connectors,
extensions, and providers.
Containerizing your custom Collector
Running a local Collector binary is fine for testing, but in your release pipelines and production environments, you'll likely want to deploy it in a container.
A good practice is using a multi-stage Dockerfile. This approach uses a
temporary builder container, which has all the necessary tools to compile your
the Collector binary. Then, it copies only the final compiled program into a
new, minimal production image.
Here's an example of what that looks like:
1234567891011121314151617181920212223242526272829# Stage 1: BuilderFROM otel/opentelemetry-collector-builder:0.131.0 AS builderWORKDIR /build# Copy the manifest file and other necessary filesCOPY manifest.yaml .# Build the custom collectorRUN ocb --config=manifest.yaml# Stage 2: Final ImageFROM cgr.dev/chainguard/static:latest# Copy the Collector binary from the builder stageCOPY /build/dist/otelcol-prod .# Copy the Collector configuration fileCOPY otelcol.yaml /etc/otelcol-prod/otelcol.yaml# Expose necessary portsEXPOSE 4317 4318# Run the container as the built-in, unprivileged 'nonroot' user.USER nonroot# Set the default command to run when the container starts.ENTRYPOINT ["/otelcol-prod"]CMD ["--config=/etc/otelcol-prod/otelcol.yaml"]
With this Dockerfile, you'll get the following image which can be subsequently
deployed to a container registry and integrated in your deployment workflow.
12REPOSITORY TAG IMAGE ID CREATED SIZEotelcol-prod 1.0.0 f650c1650880 2 minutes ago 28.7MB
Final thoughts
You now have the skills to choose the right components for your needs, build a lean and secure binary, and package it for deployment in any modern environment.
The result is a Collector that is smaller, more secure, and more efficient than any generic distribution.
To test and validate your OpenTelemetry Collector configuration, you can use the free OTelBin tool.
Thanks for reading!
