Last updated: July 14, 2026
Route Check Rule Notifications
Labels are derived from the query results produced by the check rule, and can also be added manually to a check rule for routing purposes.
Dash0 provides two ways to associate check rules with notification channels:
- Direct assignment — Assign channels directly when creating or editing a check rule
- Label-based routing — Define conditions on notification channels so they automatically receive alerts based on label matching
Label-based routing is the recommended approach for most teams. It provides several advantages:
- Dynamic routing: Alerts automatically route to the correct channels based on labels, without modifying check rules
- Centralized configuration: Manage routing logic in one place (notification channels) rather than scattered across check rules
- Easier maintenance: Add new services or teams without updating existing check rules
- Flexibility: One alert can route to multiple channels based on different label conditions
Both approaches can be combined. For example, you can use label-based routing for team channels and direct assignment for critical escalation paths.
Add Labels to Check Rules
Labels on check rules provide the metadata used for routing decisions, allowing you to direct alerts based on team ownership, priority, or other organizational dimensions.
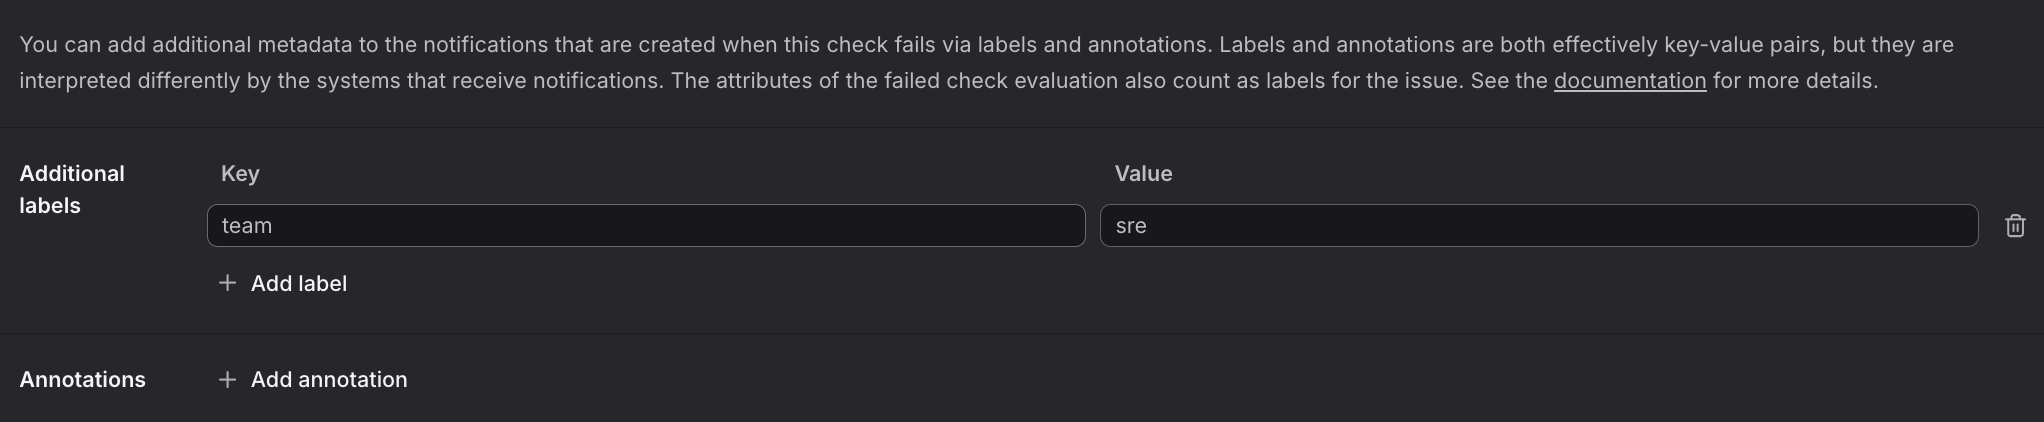
When creating a check rule, add custom labels as key–value pairs in the Additional Labels section. These are merged into the metadata of any failed check produced by that rule.
For example, adding team: sre means any notification channel configured to attract team=sre will receive alerts from this rule — regardless of which service is involved.
See Create Check Rules from Scratch for step-by-step instructions on adding labels to check rules.
Synthetic checks support the same label mechanism. Labels added to a synthetic check are included in the failed check metadata and can be used for routing.
Define Notification Conditions
Create filters on notification channels to automatically route alerts based on their labels, enabling dynamic routing without hardcoding channels in check rules.
In the Notification Channels settings, define conditions to control which failed checks trigger a given channel.
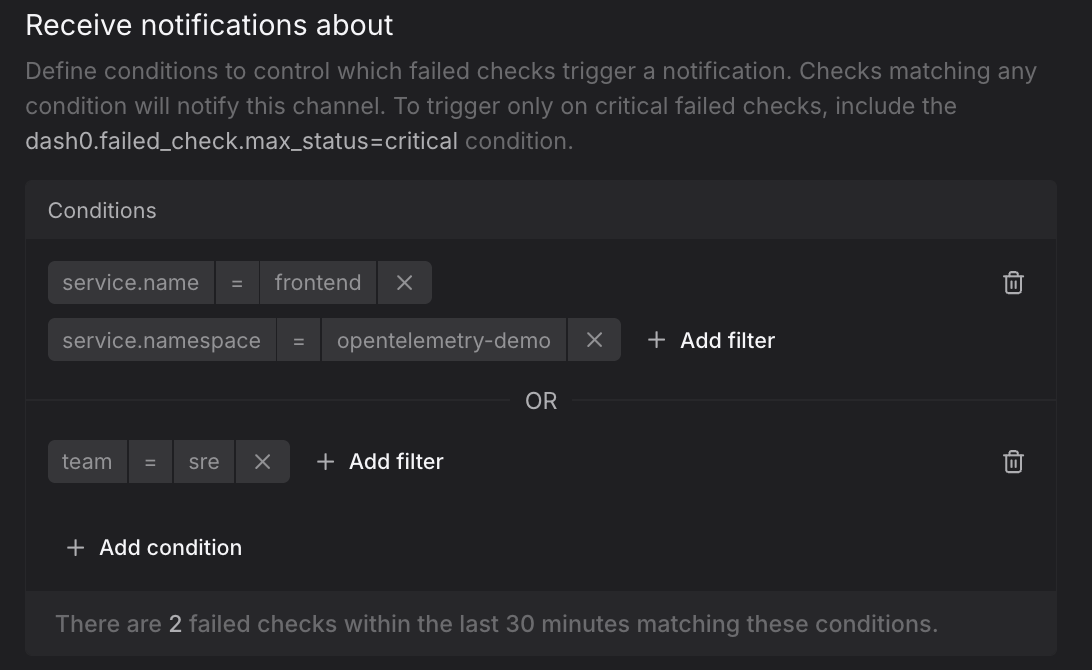
- Each condition is built from one or more filters — for example,
team = sre. - Multiple filters within a single condition are combined with AND.
- Multiple conditions are combined with OR.
Examples:
team = sre— only notifies for checks labeledteam: sre.[team = sre] OR [team = dev]— notifies for checks from either team.service_name = checkout AND priority = p1— notifies only for critical checkout service alerts.
Discover Labels and Values
When you are creating check rules, the notification condition editor provides autocompletion to help you discover available labels and values.

When you type an opening brace {, the auto-completion dropdown shows all available labels based on your query evaluation. If you don't see expected labels, check the preview chart to confirm which labels your query produces.
{{$threshold}}: The threshold value specified in the Thresholds section (degraded or critical, whichever fired).{{$value}}: The actual metric value that triggered the alert.{{$labels.label_name}}: Includes any label from your query results or hard-coded labels.
Where labels come from:
- Labels projected by your PromQL query, such as
{{ $labels.service_name }}and{{ $labels.jvm_memory_type }}below. These are visible in the evaluation preview chart legend, such as
 service_nameandjvm_memory_typebelow.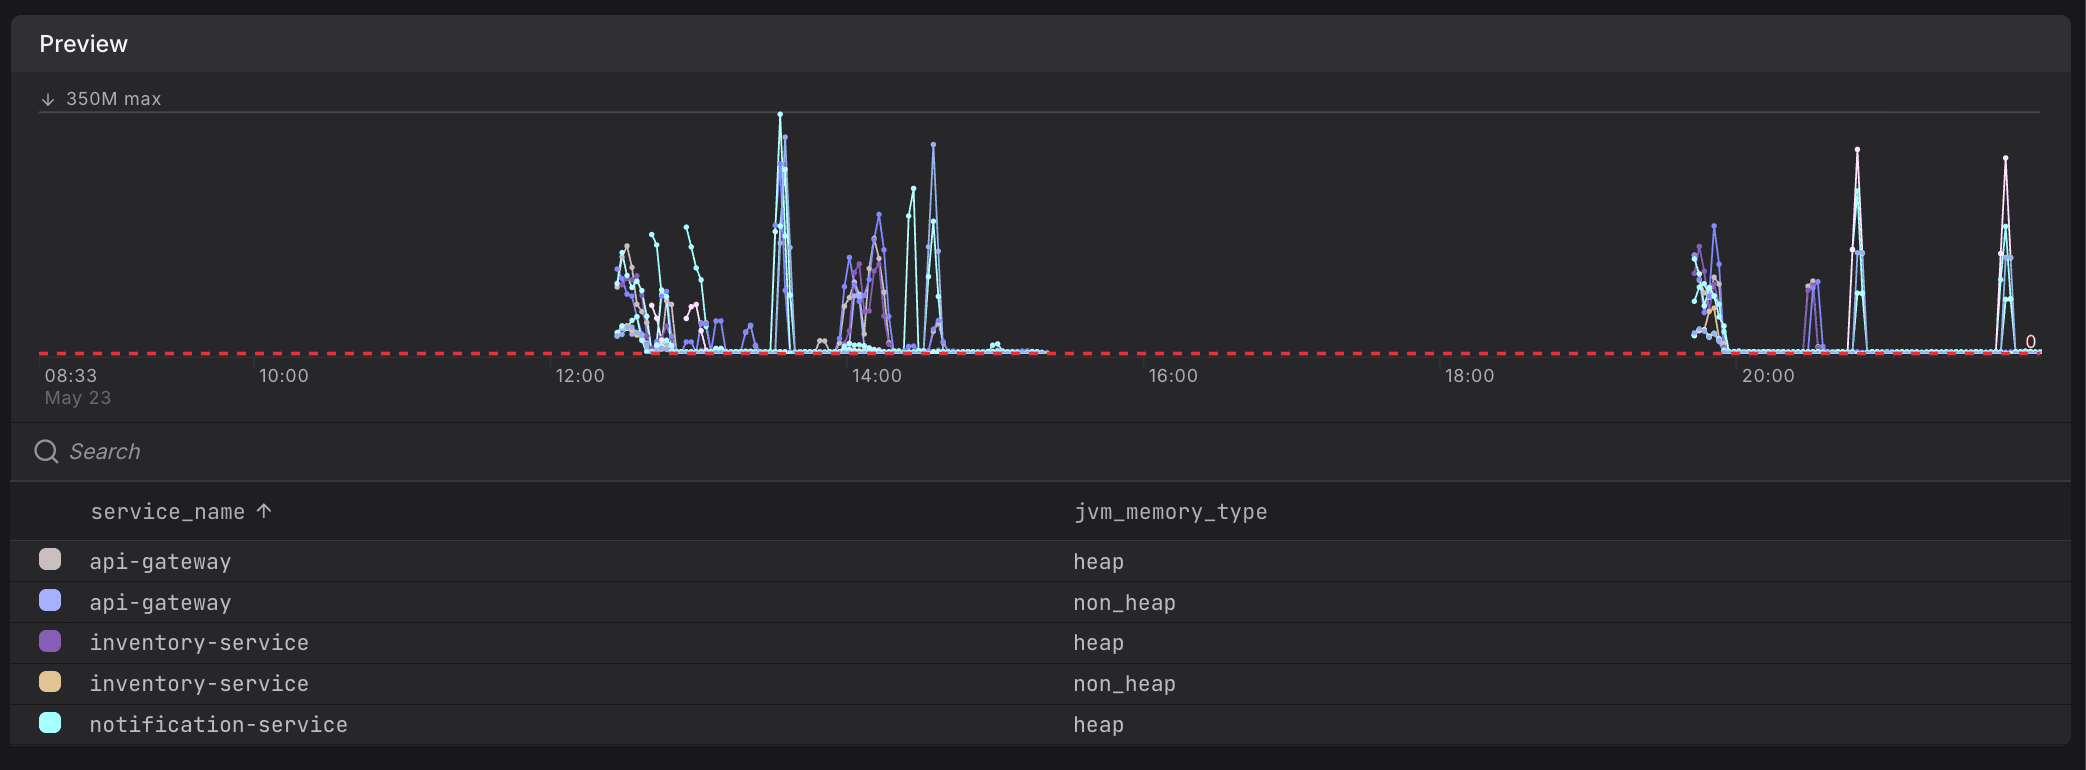
- Custom labels, which you define, such as
{{ $labels.team }}below. You define these as part of the check rule in the Additional Labels section, such as
 team:srebelow.


For details, see Optimize Alert Messages with Templates.
Route by Severity
Different notification channels often have different severity requirements, such as sending all alerts to Slack but only critical alerts to PagerDuty. You can route notifications based on severity using the dash0.failed_check.max_status attribute.
A common pattern:
- Slack — no severity filter (receives all alerts for team visibility)
- PagerDuty —
dash0.failed_check.max_status = critical(on-call notifications for critical issues only)
The dash0.failed_check.max_status attribute reflects the highest severity reached during a check's lifecycle, not its current state. Once a check escalates to critical, all subsequent notifications — including resolution — route to channels matching critical.
This ensures that if, for example, PagerDuty was notified when the check became critical, it also receives the resolution notification.
| Severity Progression | Slack (all) | PagerDuty (critical only) |
|---|---|---|
| Degraded → Degraded → Degraded | ✓ ✓ ✓ | ✗ ✗ ✗ |
| Degraded → Critical → Critical | ✓ ✓ ✓ | ✗ ✓ ✓ |
| Degraded → Critical → Degraded | ✓ ✓ ✓ | ✗ ✓ ✓ |
| Critical → Critical → Critical | ✓ ✓ ✓ | ✓ ✓ ✓ |
| Critical → Degraded → Critical | ✓ ✓ ✓ | ✓ ✓ ✓ |
| Critical → Degraded → Degraded | ✓ ✓ ✓ | ✓ ✓ ✓ |
Further Reading
- About Alert Monitoring — Overview of Dash0's alerting capabilities and how check rules monitor your systems.
- Create Check Rules — Set up check rules to monitor metrics, logs, spans, and web events using PromQL expressions and threshold values.
- Investigate Failed Checks — Troubleshoot failed checks by exploring the underlying telemetry and identifying root causes.
- Send Check Rule Notifications — Configure notification channels to keep your team informed when checks fail.
- Optimize Alert Messages with Templates — Variables and template functions for creating dynamic, contextual alert messages.