Docker doesn't clean up after itself. Every image you've pulled, every stopped container, every build cache layer, and every anonymous volume stays on disk until you explicitly remove it. On a busy development machine or CI server, that adds up fast — often 20–50 GB or more before anyone notices.
Before reaching for any cleanup command, it's worth knowing exactly what you're dealing with.
See what's consuming space
docker system df breaks down disk usage across all Docker artifacts:
1docker system df
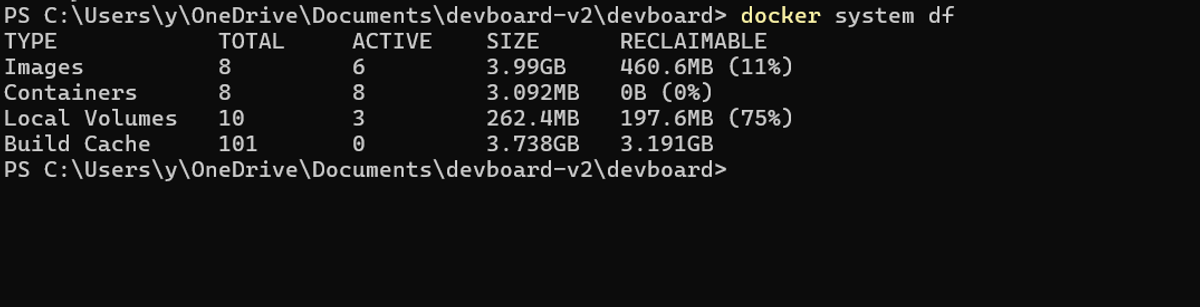 The
The RECLAIMABLE column is what matters. In the example above, over 50 GB is safe to remove. Add -v for a detailed breakdown listing individual images and containers with their sizes.
Prune everything at once
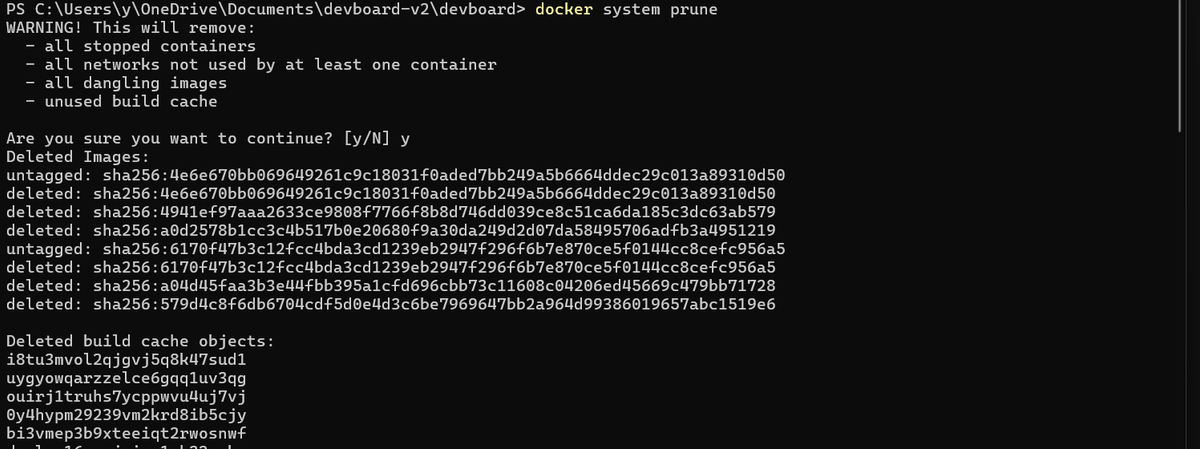
The fastest way to reclaim space is docker system prune. By default it removes stopped containers, unused networks, dangling images, and build cache, but leaves volumes and tagged images alone:
1docker system prune
 For a more aggressive cleanup that also removes unused tagged images (not just dangling ones), add
 -a:
1docker system prune -a
This is safe as long as any image you care about is either currently running or stored in a registry. Docker won't touch images that have a running container attached. Add -f to skip the confirmation prompt in shell scripts.
Dangling vs. unused images
The distinction matters when choosing how aggressively to prune.
Dangling images
Untagged layers with no reference from any container. They appear as <none> in docker images output and are almost always safe to remove. They accumulate when you rebuild images with the same tag; the old layers get orphaned. docker image prune removes these by default.
Unused images
Tagged images not referenced by any running or stopped container. They might be images you pulled for a one-off test two months ago, or old versions of your app image still sitting around. docker image prune -a removes both dangling and unused images.
To see dangling images before removing them:
1docker images -f dangling=true
123REPOSITORY TAG IMAGE ID CREATED SIZE<none> <none> d8e8fca2dc0e 3 weeks ago 1.23GB<none> <none> a3b7f2d1c0e9 5 weeks ago 856MB
To remove only dangling images:
1docker image prune
To remove all unused images:
1docker image prune -a
The difference can be significant. Pruning dangling images alone might reclaim 2 GB; pruning all unused images on the same machine might reclaim 20 GB.
Reclaim build cache
Build cache is the disk consumer most people ignore until it's too late. On an active development machine, it easily reaches 10–20 GB. Each docker build adds cache layers for every Dockerfile instruction, and they accumulate across branches, Dockerfile revisions, and projects without any warning.
Check your cache size with:
1docker system df -v | grep -A 5 "Build Cache"
To remove cache entries not referenced by any current image:
1docker builder prune
To remove everything including in-use cache entries (your next build starts cold):
1docker builder prune -a -f
If you want to reclaim space without nuking everything (for example, keeping 5 GB of recent cache for fast morning builds), use --keep-storage:
1docker builder prune --keep-storage 5g -f
You can also prune by age, which works well in CI pipelines after each build:
1docker builder prune --filter "until=48h" -f
Remove stopped containers and volumes
Stopped containers still hold their writable layers on disk. They're not huge individually, but they add up on busy systems:
1docker container prune
Volumes are where the real risk is. docker system prune does not remove volumes by default, because losing a named volume with a database in it would be unpleasant. When you're sure you don't need any unused volumes:
1docker volume prune
Note that on Docker 25.0+, docker volume prune only removes anonymous volumes. To include named volumes that aren't attached to any container, add -a:
1docker volume prune -a
Check docker volume ls before running this on any host that matters.
Automate cleanup
Manually pruning is fine once, but the disk fills up again. A weekly cron job handles it without any intervention. Open your crontab with crontab -e and add:
10 3 * * 0 /usr/bin/docker image prune -a -f --filter "until=168h" >> /var/log/docker-prune.log 2>&1
The until=168h filter removes images older than one week, which avoids clobbering anything you're actively using. For servers where you want systemd to manage the timer instead:
123456789# /etc/systemd/system/docker-prune.service[Unit]Description=Docker system pruneRequires=docker.serviceAfter=docker.service[Service]Type=oneshotExecStart=/usr/bin/docker system prune -a -f --filter "until=168h"
1234567891011# /etc/systemd/system/docker-prune.timer[Unit]Description=Run Docker prune weekly[Timer]OnCalendar=weeklyPersistent=trueRandomizedDelaySec=3600[Install]WantedBy=timers.target
For CI/CD pipelines, run a cleanup step after each build to prevent cache sprawl:
1234# GitHub Actions example- name: Clean up Dockerif: always()run: docker system prune -f
Common pitfalls
The most common misconception is what docker system prune actually does. By default it only removes dangling images, not unused tagged ones. If you've pulled fifty images that aren't running, they'll still be there after a basic prune. You need -a to clean those up.
Volumes are excluded unless you explicitly ask for them. Both docker system prune and docker system prune -a leave volumes untouched. Add --volumes to include them, but only if you know what's in those volumes. Named volumes holding database data won't announce themselves before they're gone.
If you're on macOS or Windows, you'll run into a Docker Desktop-specific issue: even after pruning containers and images, df -h shows no change. Docker Desktop runs inside a VM with a fixed virtual disk file, and that .vhdx or Docker.raw file doesn't shrink automatically. You need to go to Docker Desktop → Settings → Resources → Disk image and either reduce the size limit or use the reset option. This trips up a lot of people who prune 20 GB of images and see nothing change.
Finally, watch out for aggressive cleanup in CI environments where you're caching Docker layers for faster builds. A blanket docker system prune -a after every job will negate that entirely. Use docker builder prune --filter "until=48h" instead, or scope the cleanup to containers and dangling images only.
Final thoughts
Docker disk space problems are mostly a maintenance issue. The commands aren't complicated, but you need to run them regularly. docker system df tells you where the space went; docker system prune -a gets most of it back; and a cron job or CI cleanup step keeps it from creeping up again. If you want ongoing visibility into container resource usage (CPU, memory, network, and disk I/O), our guide to monitoring Docker with docker stats covers that in detail.
If you're managing containerized infrastructure at scale, Dash0 gives you OpenTelemetry-native visibility across logs, metrics, and traces, with Agent0, Dash0's AI control plane for production that can act on what it sees, not just display it.
Start a free trial. No credit card required.